Table of Contents
- 1. 💾 Lab: CS 200 Review
- 1.1. Academic Honesty
- 1.2. Program 1
- 1.2.1. Example output (finished program)
- 1.2.2. Starter code
- 1.2.3. How to build and run
- 1.2.4. Iteration 1: Book struct
- 1.2.5. Iteration 2: BookManager class - Shell
- 1.2.6. Iteration 3: BookManager class - Functionality
- 1.2.7. Iteration 4: BookManager class - File I/O
- 1.2.8. Iteration 5: The program loop
- 1.3. Turning in the assignment
- 2. Accessibility
1. 💾 Lab: CS 200 Review
Last updated: 2026-08-29
1.1. Academic Honesty
Academic honesty: Labs are meant to be solo-effort, done by you without human or LLM/AI assistance. The exception here is getting help from the instructor or the Academic Achievement Center tutors. I’ve written each lab to help you build a “scaffolding” as you learn new topics, in a way that will help you put everything together later in the projects.
1.2. Program 1
1.2.1. Example output (finished program)
g++ -g *.cpp -o book.exe
./book.exe
Loaded 3 record(s).

-- BOOK LOGGER --

************************************************************

ID   TITLE                         AUTHOR              STATUS
--------------------------------------------------------------------------------
0    Enshittification              Cory Doctorow       Reading
1    The AI Con                    Bender, Hanna       Finished
2    Fellowship of the Rings       J.R.R. Tolkien      Finished


Options:
0. Save and quit
1. Add new book
2. Update existing book

>> 2
Enter book index: >> 0

Status options:
1. Want to read
2. Reading
3. Finished
4. Did Not Finish
>> 3

Book #0 updated.
1.2.2. Starter code
save.txt
Enshittification
Cory Doctorow
2
The AI Con
Bender, Hanna
3
Fellowship of the Rings
J.R.R. Tolkien
3
Empty files: Book.h, BookManager.h, BookManager.cpp, Functions.h, Functions.cpp, readlog.cpp
1.2.3. How to build and run
Open GitBash or a Terminal in the directory where your sourcecode is at.
Use the g++ program to compile your source:
g++ *.cpp -g -o program.exe
The -g flag builds it in debug mode, the -o flag sets the program output to program.exe.
If you are returned to the prompt without any messages, then there were no errors. You can run the program with:
./program.exe
1.2.4. Iteration 1: Book struct
We're going to approach this program one iteration at a time, implementing a few features, then building and testing.
Starting off in Book.h we're going to create a BookStatus enum to store possible book statuses and a Book struct to store a single book's information.
Create a BookStatus enum with the following values:
| INT VALUE | LABEL |
|---|---|
| 0 | UNKNOWN |
| 1 | WANT_TO_READ |
| 2 | READING |
| 3 | FINISHED |
| 4 | DNF |
How do I make an enum?
enum class ENUMNAME
{
  VALUE1 = INTEGER,
  VALUE2 = INTEGER
};
Why use enum?
For something with a limited amount of options (like a book status), it is better to store it as something that maps to an integer rather than as a string. If we stored strings, typos would be much easier.
…
Next, write a Book struct with the following:
| Book |
|---|
+ title : string |
+ author : string |
+ status : BookStatus |
How do I make a struct?
struct NAME
{
  // Create variables
  TYPE VARNAME1;
  TYPE VARNAME2;
};
How do I read UML diagrams?
UML shows the class name as the top section, the member variables in the middle, and functions (if any) on the bottom.
It also shows NAME : TYPE, so if you see title : string, then the declaration would be string title;.
Lastly, + means "public" (struct members are public by default), - means "private", and # means "protected".
…
Before continuing, you can add some temporary code to int main() to test out the Book, for example:
int main()
{
    Book myBook;
    myBook.title = "Test Title";
    myBook.author = "Test Author";
    myBook.status = BookStatus::FINISHED;

    cout << myBook.title << endl;
    cout << myBook.author << endl;
    cout << static_cast<int>( myBook.status ) << endl;

    return 0;
}
Then you can build and run the program from the terminal like this:
 g++ -g *.cpp -o book.exe
./book.exe

Test Title
Test Author
3
1.2.5. Iteration 2: BookManager class - Shell
Within BookManager.h build the following class declaration:
| BookManager |
|---|
- m_bookArray : vector<Book> |
+ BookManager() |
+ ~BookManager() |
+ Add( title: string, author: string, status: BookStatus ) : void |
+ Update( index: size_t, newStatus: BookStatus ) : void |
+ Display() : void |
+ Size() : size_t |
- LoadData() : void |
- SaveData() : void |
How do I make a class?
class NAME
{
  public:
  // Some functions
  RETURNTYPE FUNCNAME( PARAMS );

  private:
  // Create variables
  TYPE VARNAME1;
  TYPE VARNAME2;
};
What else do I need in my .h file?
You will need file guards, which surround your file…
#ifndef _BOOKMANAGER_H
#define _BOOKMANAGER_H

// code goes here

#endif
… This prevents the .h file from being included if it has already been included elseware. If we don't have this, we will likely get "redefinition" errors during our build.
Additionally, we will need to include any libraries utilized in the code in this file. Since this class utilizes vector and string, you will need the following includes:
#include <vector>
#include <string>
using namespace std;
…
In BookManager.cpp create empty "stub" function definitions. For functions with void return types you can leave them blank. If a function has a non-void return type, just temporarily return some placeholder data, like return 0;.
How do I write member function (method) definitions?
RETURNTYPE CLASSNAME::FUNCNAME( PARAMS )
{
}
So for the Add function…
void BookManager::Add( string title, string author, BookStatus status )
{
}
…
Within main(), create a BookManager variable: BookManager bookmgr;
Build and run afterwards to make sure your syntax is correct and no build errors show up.
1.2.6. Iteration 3: BookManager class - Functionality
Here we'll implement the functions needed to get a vector working. A dynamic array is a "resizable" array that we can create with a pointer.
- BookManager constructor
The constructor is a special function that gets called automatically when a new variable of this type (BookManager) is created. We can use the constructor to initialize the member variables.
Within this function call the
LoadData()function.How do I write a constructor?
Constructors don't have return types, and the name must match the class' name.
BookManager::BookManager()
{
  // Add stuff
}
…
- BookManager destructor
The destructor is a special function that is called automatically when the variable is destroyed (goes out of scope). It can be used for cleanup.
Within this function, call the
SaveData()function.How do I write a destructor?
Destructors don't have return types, and the name must match the class' name but with a tilde ~ at the start.
BookManager::~BookManager()
{
  // Add stuff
}
…
- LoadData function
We'll implement file input and output later, but for now just use a cout statement to display “LoadData” or something so we can track that the function got called.
…
- SaveData function
For now just use a cout statement to display “SaveData” or something so we can track that the function got called.
…
- Add function
The parameters passed in here are the title, author, and book status. Since we’re using a STL Vector type, we use the
m_bookArray.push_back( THING );function to add new items, but we have to assemble a Book object first. Create a Book variable, set up its title, author, and status based on the parameters passed into this function, and then call the book array’s pushback function to add the new book to the vector.…
- Update function
This function takes in an
indexand anewStatus. Within the function, update them_bookArrayelement at this index and change its status to the new status. Also use cout to display a confirmation that the change happened.Error checking: It is possible that the index passed in is INVALID! If the index is less than
0OR greater-than-or-equal-tom_bookArray.size()then the index is bad and we should NOT perform any operations.…
- Helper function
Let's add a couple of helper functions for the BookStatus. Within the Functions.h file, add the following declaration:
string GetBookStatusString( BookStatus status );
In Functions.cpp we will define these functions. Basically, use an if statement to check what the value of status is, then return a corresponding string.
BookStatus String to return BookStatus::WANT_TO_READ"Want to read" BookStatus::READING"Reading" BookStatus::FINISHED"Finished" BookStatus::DNF"Did Not Finish" BookStatus::UNKNOWN"Unknown" …
- Display function
Back in BookManager.cpp, we'll implement the Display function. Use a for loop to iterate over all the items in the array [=0=,
m_bookArray.size()) and display each book's title, author, and status.…
- Testing it out
Back in main() you can erase the code we wrote to test the previous iteration. This time, we will want to test out the functionality of the BookManager. Here's some testing code:
BookManager bookmgr;
bookmgr.Add( "A", "A", BookStatus::READING );
bookmgr.Add( "B", "B", BookStatus::WANT_TO_READ );
bookmgr.Add( "C", "C", BookStatus::FINISHED );
bookmgr.Display();
Build and run the program to test.
g++ -g *.cpp -o book.exe
./book.exe
Book added.

Book added.

Book added.
   ID                         TITLE              AUTHOR              STATUS
--------------------------------------------------------------------------------
    3                             A                   A             Reading
    4                             B                   B        Want to read
    5                             C                   C            Finished
…
1.2.7. Iteration 4: BookManager class - File I/O
Next we're going to update the BookManager class so that when the program starts the data file "save.txt" will be loaded, and when the program ends the data will be saved out to the same file.
- LoadData function
Remember that the data file looks like this:
Enshittification
Cory Doctorow
2
The AI Con
Bender, Hanna
3
Fellowship of the Rings
J.R.R. Tolkien
3
It is in the form….
TITLE 1
AUTHOR 1
STATUS 1
TITLE 2
AUTHOR 2
STATUS 2
TITLE 3
AUTHOR 3
STATUS 3
We will need some variables to store each of these pieces of data as we load ‘em in:
string title,string author,int statusnum,BookStatus statusFollow the steps to load and parse the data:
- We will need to create an input file stream (
ifstream) variable here and tell it to open our "save.txt" file.ifstream input( "save.txt" ); If the file fails to open (such as it doesn't exist yet), we're going to just return early; a new save file will be created when the program is closed.
if ( input.fail() ) { return; }Next we'll create a while loop that will read the first line in a series. The file stores data for each book in 3 separate lines: title, then author, then book status.
Start the loop like this:
while ( getline( input, title ) )Within the while loop do the following:
- We just read in the title. The next line will be author. Read the second line:
getline( input, author );. Read the third line, which is an integer:
input >> statusnum;Then use
input.ignore();Then set the current book's status to the int just read in. We will have to use a casting ability to change it from an integer into our enum:
status = static_cast<BookStatus>( statusnum );- Call the Add function, passing in the three variables we just loaded in. This should add the book to the vector.
- We just read in the title. The next line will be author. Read the second line:
…
- We will need to create an input file stream (
- SaveData function
Save will be a bit easier. Do the following:
- Create
ofstream output( "save.txt" );. - Create a for loop that goes from
0(inclusive) tom_bookArray.size()(non-inclusive). Within the loop, write each book's title, author, and status (as integer) to theoutputfile.
…
How do I convert the BookStatus enum to an integer?
To convert a BookStatus to an integer, we again use static cast:
output << static_cast<int> (m_bookArray[i].status) << endl;
…
How do I iterate over the vector of books?
You can either iterate over the book array with a traditional for loop, accessing each item by index:
for ( size_t i = 0; i < m_bookArray.size(); i++ )
{
  // Do something with m_bookArray[i] ...
  cout << m_bookArray[i].title << endl;
}
Or using a range-based for loop:
for ( Book& book : m_bookArray )
{
  // Do something with book ...
  cout << book.title << endl;
}
(These are just example code snippets, you won’t be using cout here.)
…
- Create
- Testing the updates
Back in main() we'll again add some test code:
int main()
{
    cout << left;
    BookManager bookmgr;
    bookmgr.Add( "TEST", "TEST", BookStatus::READING );

    bookmgr.Display();

    return 0;
}
Build and run:
g++ -g *.cpp -o book.exe
/book.exe

Book added.
ID   TITLE                         AUTHOR              STATUS
--------------------------------------------------------------------------------
0    Enshittification              Cory Doctorow       Reading
1    The AI Con                    Bender, Hanna       Finished
2    Fellowship of the Rings       J.R.R. Tolkien      Finished
3    TEST                          TEST                Reading
Each time you run it, a new "TEST" book will be appended to the end of the list.
…
1.2.8. Iteration 5: The program loop
Last, we will implement a program within main() that provides a menu for the user to add and update books.
- Functions file: GetIntInput
Within the functions header file add the following function declaration:
int GetIntInput( int min, int max );
- In the function definition, have the user enter an integer value - create an int variable then use
cin >>to get their input. Create a while loop that loops while the input was invalid (input is invalid if it's less than the min or greater than the max).
Within the loop display an error message and ask the user to enter their selection again. Make sure to contain another
cinstatement.- After the loop the user's selection should now be valid. Return their choice.
…
- In the function definition, have the user enter an integer value - create an int variable then use
- Functions file: GetBookStatusInput
Within the functions header file add the following function declaration:
BookStatus GetBookStatusInput();
Display a numbered list of status options, such as:
1. Want to read
2. Reading
3. Finished
4. Did Not Finish
Then ask the user to enter an option (you can call
GetIntInputhere).Check what their response was with if statements or a switch statement, and return the corresponding BookStatus.
…
- BookManager: Size()
For this function just return
m_bookArray.size().…
- main()
Now we'll implement the actual program in
main(). Follow these steps:- At the start of main make sure you have the
BookManager bookmgr;variable declared. - Create a bool done variable and initialize it to
false.- Call the book manager's
Display()function. Display a numbered list of options, such as:
0. Save and quit
1. Add new book
2. Update existing book
- Get the user's input using the
GetIntInputfunction. - Branch based on their selection:
- If it is 0, set
donetotrue. If it is 1, create string variables for title and author and a BookStatus variable for status.
Call
cin.ignore(), then ask the user to enter the book's title and author (usegetlinefor these).Next ask for the status, and call the
GetBookStatusInput()function to get the result.Finally, call book manager's
Addfunction, passing in the variables.If it is 2, ask the user to enter a valid book index (call the
GetIntInputfunction).Next, create a BookStatus variable and ask the user to enter the updated status (call
GetBookStatusInput).Finally, call the book manager's
Updatefunction, passing in the book's index and the updated status.
- If it is 0, set
- Call the book manager's
Now when you build and run the program you should get a functioning program where you can add new books and update existing books' statuses, and the data will be saved when the program is closed and loaded when the program starts.
…
- At the start of main make sure you have the
1.3. Turning in the assignment
For this week we're going to upload the code via GitLab's web interface, but starting next week we will use git on the desktop.
1.3.1. Uploading your code via the web interface
We will work with git on the desktop next week. For now, here are steps for working with GitLab via the web interface.
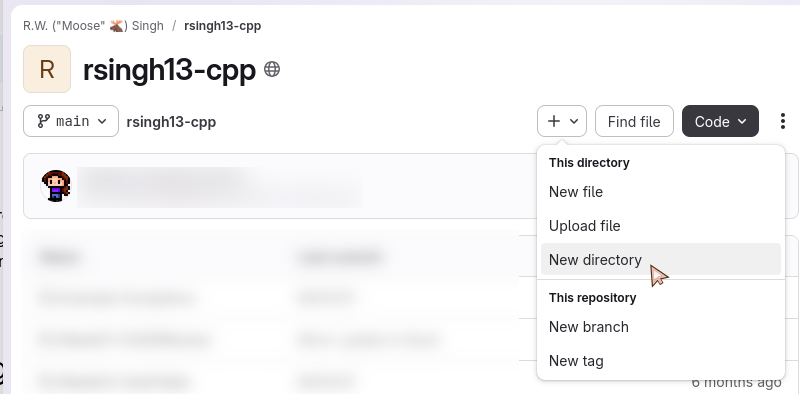
Figure 1: Screenshot of the 'new directory' button being highlighted.
Go to your repository webpage. Locate the “+” button, click it, and select “New directory”.
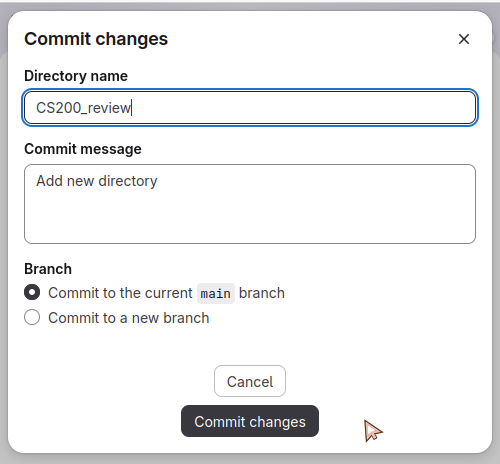
Figure 2: Screenshot of the directory name being set in GitLab.
Give the directory name something like “CS200review” - NO SPACES!
Click “Commit changes” after.
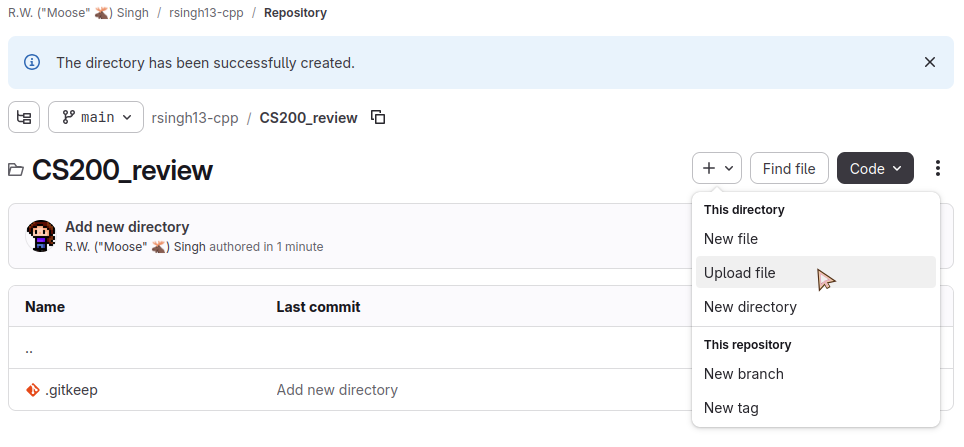
Figure 3: Screenshot of the 'CS200review' folder on the web interface, and selecting 'Upload file'.
It will enter that folder. Click on “+” again, then choose “Upload file”. (You will only need to upload the LAST version of the recipe.) Choose one of the files to upload, then click “Commit changes”.
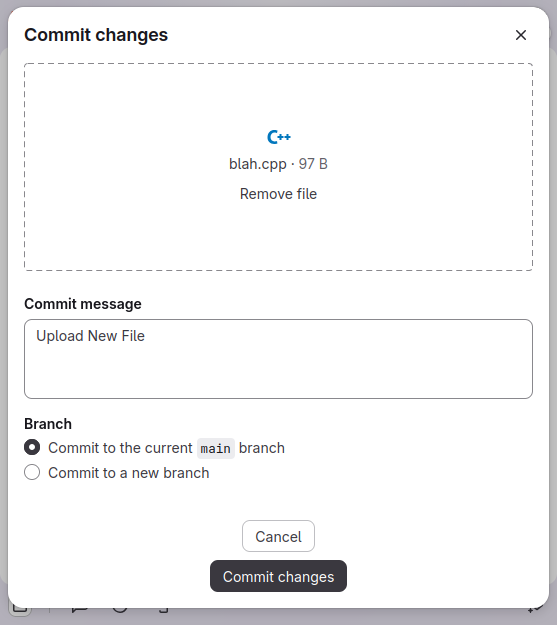
Figure 4: Screenshot of the commit changes pane in GitLab's webpage.
The file will get uploaded and you will see it in the web interface.
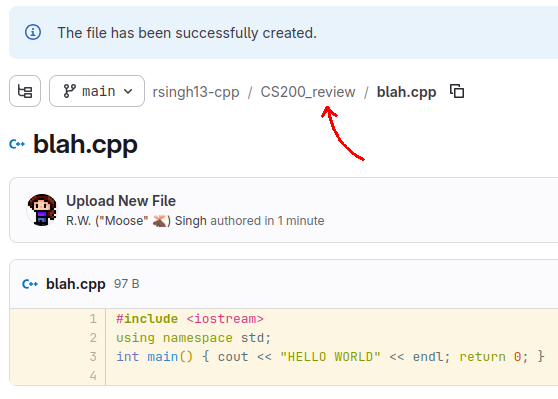
Figure 5: Screenshot the 'breadcrumb' links in GitLab, with an arrow pointing to the 'CS200review' folder to click on.
Click back on the previous folder link to go back to the project folder. This is the location from where you’ll copy the URL.
1.3.2. Turning in on Canvas
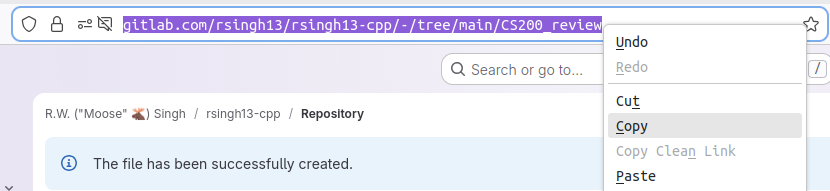
Figure 6: Screenshot of the address bar in the web browser highlighted with the 'Copy' option highlighted.
Copy the URL from your project folder on GitLab.

Figure 7: Screenshot of a Canvas assignment and the 'Start Assignment' button.
On the Canvas assignment, click “Start Assignment”.
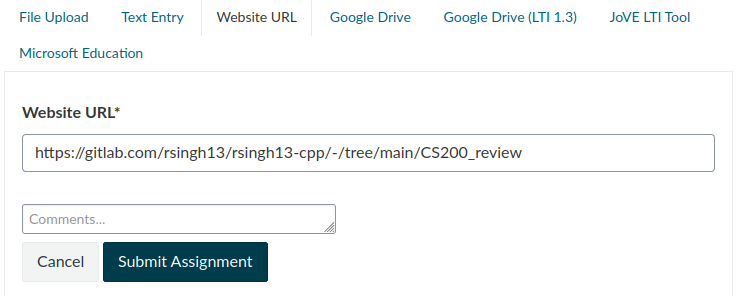
Figure 8: A screenshot of the 'Website URL' upload view in a Canvas assignment, with a GitLab URL pasted in.
Paste in the website URL then click “Submit Assignment”.