Table of Contents
- 1. Coming from arrays…
- 2. LinkedNode structure - Wrapping the data and storing neighbor pointers
- 3. List class functionality
- 4. Implementing a Doubly-Linked List
- 4.1. Structure of a DoublyLinkedList's Node
- 4.2. DLNode's Constructor
- 4.3. Structure of our DoublyLinkedList
- 4.4. DoublyLinkedListTester
- 4.5. main
- 4.6. DoublyLinkedList::DoublyLinkedList() constructor
- 4.7. DoublyLinkedList::~DoublyLinkedList() Destructor
- 4.8. Clear
- 4.9. IsEmpty
- 4.10. Size
- 4.11. PopFront
- 4.12. PushFront
- 4.13. GetFront
- 4.14. GetAt
- 4.15. Tips for the remaining functions
- 4.16. PopBack
- 4.17. PushBack
- 4.18. GetBack
- 4.19. PopAt
- 4.20. PushAt
1. Coming from arrays…
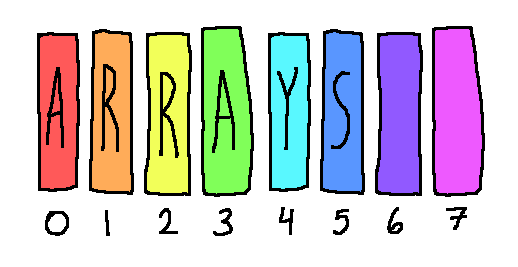
Before taking a Data Structures course, you've probably only managed data in your program via arrays.
When we declare an array in C++, we must give it a size (whether we're making a dynamic array or a vanilla array). This ensures that memory can be allocated so that each element of the array is side-by-side with other elements.
Investigating arrays and memory addresses
Let's write a simple program to look at how arrays are stored in memory, in case you don't remember.
First, how big is one element? We can use the sizeof function to find out how
big, in bytes, a given data type is:
cout << "The size of a int is: "
     << sizeof( int ) << " bytes." << endl;
The size of a int is: 4 bytes.
One integer is 4 bytes. Next, we can declare an array of integers and look at how many bytes that takes up:
const int SIZE = 10;
int intArr[SIZE];
cout << "Size of a int array with "
     << SIZE << " elements: "
     << sizeof( intArr ) << " bytes." << endl;
Size of a int array with 10 elements: 40 bytes.
Now, let's look at the memory addresses of each element:
cout << "Memory addresses for the int array:" << endl;
for ( int i = 0; i < SIZE; i++ )
{
    cout << "Element " << i << ": " << &(intArr[i]) << endl;
}
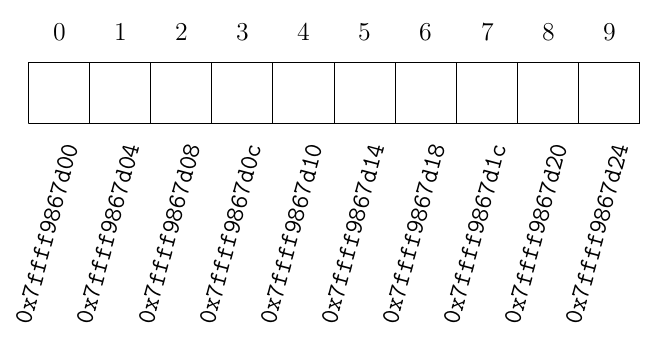
Memory addresses for the int array:
Element 0: 0x7ffff9867d00
Element 1: 0x7ffff9867d04
Element 2: 0x7ffff9867d08
Element 3: 0x7ffff9867d0c
Element 4: 0x7ffff9867d10
Element 5: 0x7ffff9867d14
Element 6: 0x7ffff9867d18
Element 7: 0x7ffff9867d1c
Element 8: 0x7ffff9867d20
Element 9: 0x7ffff9867d24
Each time this program runs, we will have different memory addresses for the intArr, but those addresses will always be contiguous in memory, 4 bytes apart.
- Sidenote 1: Hexadecimal
- When we write in hexadecimal, we want each number to only take up one character space. So, we have 0-9 to be 0 through 9, but then 10 is A, 11 is B, 12 is C, 13 is D, 14 is E, and 15 is F.
- Sidenote 2: Address of the beginning of the array
- The address of
intArris the same as the address ofintArr[0].
Pros and Cons of arrays for storing data
- Pros:
- Random access is instant: This means, we can access an element at
any arbitrary index instantaneously. How? Well, we have the address of
the 0th element, and to get an item at position \(i\), we just have to
add
i * sizeof(int). A simple math operation is virtually instant.AddressOf( i ) = AddressOf( 0 ) + i * sizeof( dataType )
- Random access is instant: This means, we can access an element at
any arbitrary index instantaneously. How? Well, we have the address of
the 0th element, and to get an item at position \(i\), we just have to
add
- Cons:
- Resizing a dynamic array is costly: Any time our array is full, to resize it we have to allocate memory for a new array of a bigger size. Then, we have to copy each element from the old array to the new array. This takes time any time resize occurs.
- We have to over-estimate the array size: We don't want to have to resize the entire array every time a new item is inserted, so we generally will resize it by some quantity each time (not just adding 1 to the size of the array). This means we're allocating more space than we're actually using if the array isn't full.
The study of Data Structures is all about the trade-offs between different data types: Some are faster to access data but slower to insert new data and vice versa. Instead of storing data in an array-based structure, we can make a tradeoff of less memory used, instant insertion of new data in exchange for slower access using a linked structure.
A dynamic array:
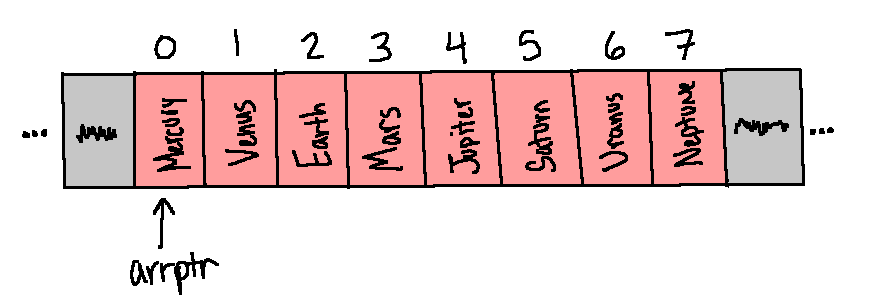
A linked list:

Review 1. Arrays are fast at _ and, over time, arrays are somewhat slow at _.
(a) Random access, (b) Adding new data
Review 2. Arrays are not space-efficient because…
○ We have to over-estimate how much space will be needed; there will (almost) always be unused spaces.
○ We only allocate space for one element at a time, linking it back to its previous and next items.
Review 3. If you didn't over-estimate the size of an array, only allocating exactly as much memory as you need at a given time, then your performance would tank because…
○ Every insert requires a resize, which is slow.
○ Every insert requires updating pointers "ptrNext" and "ptrPrev", which is slow.
2. LinkedNode structure - Wrapping the data and storing neighbor pointers

Figure 1: A drawing of two nodes pointing at each other.
The Node is one of the two structures we build when implementing a linked list or other linked type structure. The node is responsible for storing the data itself, and storing one or more pointers.
- Singly-linked List's Nodes

Figure 2: A drawing of nodes A, B, and C, each node only pointing to its next neighbor.
With a singly-linked list, the nodes only point to the next Node after them. These nodes don't know what comes before each of themselves.
| SinglyLinkedNode | |
|---|---|
- data |
: TYPE |
- ptrNext |
Node<TYPE>* |
template <typename T>
struct Node {
public:
  Node();
  Node<T>* ptrNext;
  T data;
};
- Doubly-linked List's Nodes

Figure 3: A drawing of nodes A, B, and C, each with arrows pointing to the next and previous items.
With a doubly-linked list, the nodes point to both the next Node and the previous Node.
| DoublyLinkedNode | |
|---|---|
- data |
: TYPE |
- ptrPrev |
Node<TYPE>* |
- ptrNext |
Node<TYPE>* |
template <typename T>
struct Node {
public:
  Node();
  Node<T>* ptrNext;
  Node<T>* ptrPrev;
  T data;
};
Warning! Remember that any class with pointers in it should be setting
those pointers to nullptr in its constructor!
A Node is simple enough that you could implement it as a struct instead of a class, but it's up to you. A Node is only used by the List (or linked structure) itself, the user wouldn't be accessing the Node or even know about it.
Single vs. Double?
I generally prefer to teach how to implement a doubly-linked list first, because the functionality is easier to implement when each Node is aware of what comes before itself.
Once you understand how a doubly-linked list works, you can figure out a singly-linked list; it just means having to iterate through the list more often.
- The Node structure contains…
- ○ Data, pointer to first node of list, Pointer to last node of list
- ○ Data and at least one pointer to a neighbor
- ○ Just data
- ○ Just pointers
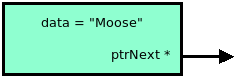
- Identify each of the following items:
 ]]
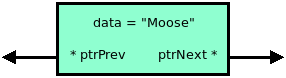 ]]
- When a new Node is instantiated its pointers need to be
initialized to a safe value. Which of the following represents a properly initialized Node?
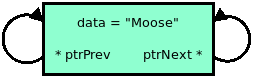 ]]
 ]]
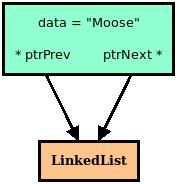 ]]
3. List class functionality

The List class itself is what handles interfacing with the "user" (or other programmers using your List). Data Structures generally will have Access, Add, Remove, and Search functionality, and those functions (and helper functions) are stored in our List.
The List will also keep track of the first Node in the list, and often also
the last Node by storing Node* pointers. (You could get by without the last
Node pointer, but it's just easier, dude.)
The list is also responsible for the memory management - it will allocate
memory for a new Node when it's needed, and free the memory of a Node when
it's to be removed.
3.1. Member variables of a DoublyLinkedList
If we're building a Doubly Linked List this means that our Nodes will keep track of pointers to their previous and next neighbors. For the List itself, we need at minimum a pointer to the FIRST Node in the list, but we could also store a pointer to the LAST Node in the list as well to make implementation simpler.
For our DoublyLinkedList we will have private member variables
ptrFirst and ptrLast, which are both Node pointers. Each Node
will include its own data, as well as a ptrPrev pointer and a
ptrNext pointer. If a Node doesn't have a neighbor in a direction,
then that pointer is set to nullptr.
An empty LinkedList will begin with its ptrFirst and ptrLast
both pointing to nullptr.
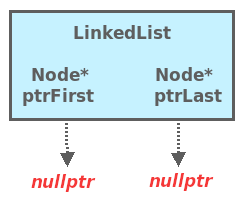
Figure 4: A LinkedList with its ptrFirst and ptrLast both pointing to nullptr.
A LinkedList with one item will have both ptrFirst and ptrLast
both pointing to the single Node.
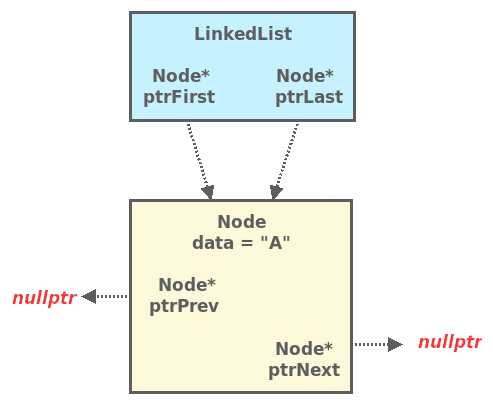
Figure 5: A LinkedList with a single node. The ptrFirst and ptrLast pointers from the LinkedList are both pointing to its single Node.
And as we get more and more Nodes, our LinkedList still only tracks the first and last Nodes - it is then up to each Node to keep track of its neighbors. The LinkedList only knows about its first and last Nodes! (And in some implementations, not even the last one!)

Figure 6: A box representing LinkedList and three boxes representing Nodes with data "A", data "B", and data "C". LinkedList's ptrFirst is pointing to the "A" node, and its ptrLast is pointing to the "B" node. "A" node's ptrPrev points to nullptr, and its ptrNext points to node "B". "B" node's ptrPrev points to node "A", and its ptrNext points to node "C". "C" node's ptrPrev points to node "B", and its ptrNext points to nullptr.
Managing this structure comes down to adding, removing, and updating these pointers, as well as allocating memory for new Nodes when new data is added, and deallocating memory for Nodes once they get deleted.
Let's look at how a LinkedList works graphically before we jump into the code.
3.2. Getting data
Let's say we're starting with a LinkedList that has several Nodes.

How do we access any given Node in the list? The Front of the list
corresponds to ptrFirst and the Back of the list corresponds to
ptrLast - we have pointers to both of these Nodes from the
LinkedList itself. If we want a Node somewhere in the middle, we
will have to do a bit more work.
3.2.1. GetFront()
Access the LinkedList's ptrFirst, then grab the data from
there, returning ourList->ptrFirst->data.
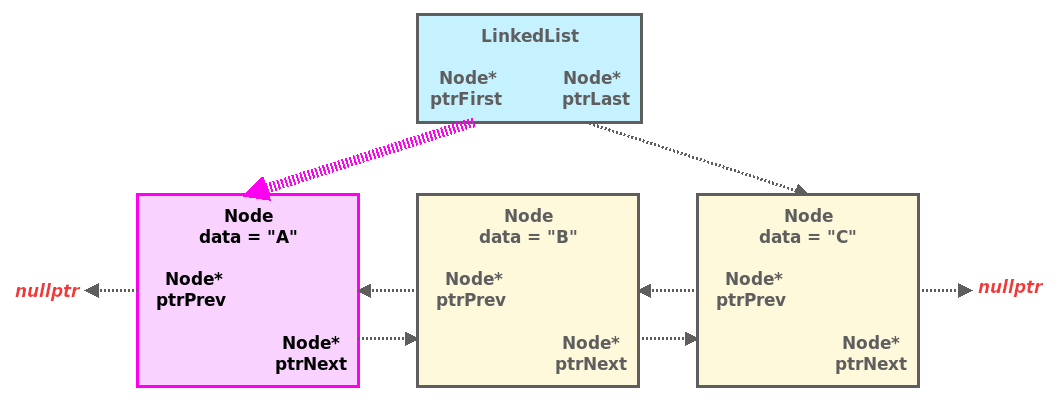
Figure 7: A LinkedList with the pointer to ptrFirst and the last Node highlighted.
3.2.2. GetBack()
Access the LinkedList's ptrLast, then grab the data from there, returning
ourList->ptrLast->data.

Figure 8: A LinkedList with the pointer to ptrLast and the last Node highlighted.
3.2.3. GetAt( index )
This function will take in an index position. We
will have to start at the ptrFirst Node and then traverse
forward however many times until we get to that index.
We will need to create our own Node pointer to help us do this,
starting it at the ptrFirst Node. In the code, this would look
like Node* ptrWalker = ourList->ptrFirst. We're not allocating
memory! This pointer is just for pointing!

Figure 9: A Node* ptrWalker that has been initialized to the list's ptrFirst Node.
Once it's initialized, we would create a loop that counts up to the
index given. Each iteration in the loop, we move the walker
forward by accessing the pointed-to-Node's ptrNext. Code-wise, it
looks like this: ptrWalker = ptrWalker->ptrNext.

Figure 10: ptrWalker is now pointing to the Node pointed to via ptrFirst's ptrNext.
Once we've looped the appropriate amount of times our walker pointer
is at the location of the data we want, so we would then return
ptrWalker->data.
3.3. Pushing new data
3.3.1. Pushing the first item in the list
Whether you're adding new data at the front or back of the list, the steps are the same for the very first item. We start with an empty LinkedList:

Figure 11: A LinkedList with its ptrFirst and ptrLast both pointing to nullptr.
We allocate space for a new Node and set up its data:
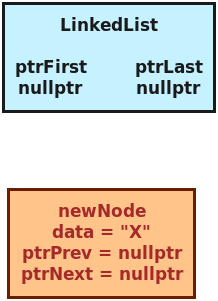
Figure 12: A LinkedList with its pointers still set to nullptr, but a newNode object created and data set. The newNode's ptrPrev and ptrNext is nullptr.
Then we update the LinkedList's Node pointers to this new Node:
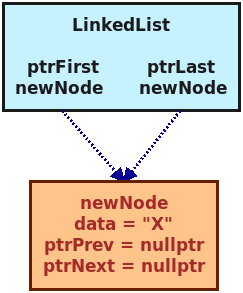
Figure 13: The LinkedList has been updated so that its ptrFirst and ptrLast pointers are both pointing to the newNode.
If we're adding a new Node to a non-empty list, then we need to decide how to handle it based on the position where we're adding the new data: Front, back, or somewhere in the middle?
3.3.2. PushFront( newData )
Our LinkedList already has a few items added to it:
Figure 14: A LinkedList. Its ptrFirst is pointing to Node A and its ptrLast is pointing to Node C. Node A's next is Node B. Node B's next is Node C. Node C's prev is Node B. Node B's prev is Node A.
Our new Node is going to be at the ptrFirst location, but we need
to also update the pointers from the new Node to Node A (the
"old-first"), and then update the LinkedList's ptrFirst.

Figure 15: A LinkedList. Its ptrFirst is Node X. NodeX's next is Node A. Node A's prev is Node X.
3.3.3. PushBack( newData )
Our LinkedList already has a few items added to it:
Figure 16: A LinkedList. Its ptrFirst is pointing to Node A and its ptrLast is pointing to Node C. Node A's next is Node B. Node B's next is Node C. Node C's prev is Node B. Node B's prev is Node A.
Our new Node is going to be at the ptrLast location, but we need
to also update the poitners from the new Node to Node C (the
"old-last"), and then update the LinkedList's ptrLast.

Figure 17: A LinkedList. Its ptrLast is Node X. NodeX's prev is Node C. Node C's next is Node X.
3.3.4. PushAt( newData, index )
Our LinkedList already has a few items added to it:

Figure 18: A LinkedList with four Nodes: A, B, C, and D. The List's first is Node A, and its last is Node D.
We want to add some new data at some index. For example, n. First we need to use a Walker pointer to iterate n times to get to the spot we need.

Figure 19: Nodes A, B, C, and D are neighbors. The Walker pointer is pointing to Node C.
This is where the new data will live. We can allocate space for the new Node, but we also need to update the neighbors. We want the Node before the walker to be X's (newNode's) previous, and the Node at the walker to be X's next, where our new Node X is taking the index from where the walker is at.
We could create another pointer to point to walker->ptrPrev, so
that setting up all the neighbors will be easier, but this is
optional:

Figure 20: The List with nodes A, B, C, and D. The Before pointer is pointing to Node B. The Walker pointer is pointing to Node C.
We can then place our new Node in the position between the
walker->ptrPrev and the walker, updating the three Nodes'
neighbor pointers:

Figure 21: The List's Nodes have been updated to A, B, X, C, and D. X is between B and C.
Using the "Before" alias pointer, our neighbor updates are:
before'sptrNextisnewNodenewNode'sptrPrevisbeforenewNode'sptrNextiswalkerwalker'sptrPrevisnewNode
Or, without the "Before" alias pointer, our neighbor updates are:
walker->ptrPrev'sptrNextisnewNodenewNode'sptrPreviswalker->ptrPrevnewNode'sptrNextiswalkerwalker'sptrPrevisnewNode
3.4. Popping data
3.4.1. Popping the last item
If our LinkedList has only one Node left, then the functionality for removing that Node will be the same no matter whether we're accessing it from the "ptrFirst" or "ptrLast".
We have our List with one Node:
Figure 22: A List with its ptrFirst and ptrLast both pointing at the same single Node.
We delete that Node, either via our List's ptrFirst or ptrLast
(doesn't matter which), then reset the ptrFirst and ptrLast
pointers back to nullptr:
Figure 23: A List with its ptrFirst and ptrLast both pointing to nullptr.
3.4.2. PopFront( newData )
Here our LinkedList already has a few items in it:
Figure 24: A LinkedList. Its ptrFirst is pointing to Node A and its ptrLast is pointing to Node C. Node A's next is Node B. Node B's next is Node C. Node C's prev is Node B. Node B's prev is Node A.
Removing the Front of the List means we want to delete the Node that the List's ptrFirst is pointing to. However, before we do that, we need to set a new First (First's ptrNext), and then make sure our new First Node's ptrPrev is reset to nullptr.

Figure 25: LinkedList's ptrFirst is pointing to Node B and Node B's ptrPrev is pointing to nullptr. Node A is shown crossed out, as it gets deleted.
3.4.3. PopBack( newData )
Here our LinkedList already has a few items in it:
Figure 26: A LinkedList. Its ptrFirst is pointing to Node A and its ptrLast is pointing to Node C. Node A's next is Node B. Node B's next is Node C. Node C's prev is Node B. Node B's prev is Node A.
Removing the Back of the List means we want to delete the Node that the List's ptrLast is pointing to. However, before we do that, we need to se a new Last (Last's ptrPrev), and then make sure our new Last Node's ptrNext is reset to nullptr.

Figure 27: LinkedList's ptrLast is pointing to Node B and Node B's ptrNext is pointing to nullptr. Node C is shown crossed out, as it gets deleted.
3.4.4. PopAt( newData, index )
Here our LinkedList already has a few items in it:
Figure 28: A LinkedList. Its ptrFirst is pointing to Node A and its ptrLast is pointing to Node C. Node A's next is Node B. Node B's next is Node C. Node C's prev is Node B. Node B's prev is Node A.
Let's say we want to get rid of the middle node, Node B. We will again need a Walker pointer to walk to this location. This is the Node that we want to delete, but we need to update Walker's previous Node's neighbors and Walker's next Node's neighbors.

Figure 29: The list with Nodes A, B, and C, and the Walker pointer is pointing to Node B.
We can again create alias pointers, or work through the Walker itself.

Figure 30: The list with Nodes A, B, and C. Before pointer is pointing to Node A. After pointer is pointing to Node C. Walker pointer is pointing to Node B.
We update the Node's neighbors:
before'sptrNextisafterafter'sptrPrevisbefore
Or, using just the Walker and not the alias pointers:
walker->ptrPrev'sptrNextiswalker->ptrNextwalker->ptrNext'sptrPreviswalker->ptrPrev
Then we can delete the middle node via the Walker: delete ptrWalker;

Figure 31: Node B, pointed to by the Walker pointer, is crossed out as it is deleted. Node A's next is Node C. Node C's previous is Node A.
3.5. Error checks to keep in mind
As we're working on this structure we also need to keep a few error checks in mind, and throw exceptions in these cases:
- For the Get functionality, if the List is empty we can't return anything!
- For the Pop functionality, if the List is empty we can't remove anything!
- For the At functionality, you need to check that the index passed in is valid - should be 0 or greater, and should be less than the node count.
Review 7. The _ class contains functionality to Add, Remove, and Access data.
○ Node / ○ List
Review 8. Which is which?
(a) Has
ptrFirstandptrLast:○ Linked List / ○ Node
(b) Has
ptrPrevandptrNext:○ Linked List / ○ Node
Review 9. Given this list:
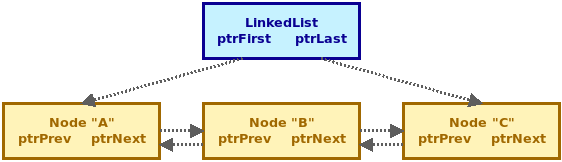 ]]
- a. If we access
list->ptrFirst->data, we will get back: - b. If we access
list->ptrFirst->ptrNext->data, we will get back: - c. If we access
list->ptrFirst->ptrNext->ptrNext->data, we will get back: d. We can access "C" via:
○
GetBack()/ ○GetFront()/ ○GetAt(1)e. We can access "A" via:
○
GetBack()/ ○GetFront()/ ○GetAt(1)f. We can access "B" via:
○
GetBack()/ ○GetFront()/ ○GetAt(1)
Review 10. Starting with this list:
]]
Identify which operation represents a call to which function:
 ]]
 ]]
 ]]
 ]]
 ]]
 ]]
4. Implementing a Doubly-Linked List
4.1. Structure of a DoublyLinkedList's Node
Start by creating a DLinkedList.h file. We can declare our Node for our Doubly Linked List at the top of this file, which will look like this:
| DLNode | |
|---|---|
+ data |
: TYPE |
+ ptrNext |
: DLNode<TYPE>* |
+ ptrPrev |
: DLNode<TYPE>* |
+ DLNode() |
|
+ DLNode( newData : T ) |
#ifndef _DLINKEDLIST
#define _DLINKEDLIST

#include <stdexcept>
using namespace std;

template <typename T>
struct DLNode
{
    DLNode();
    DLNode( T newData );

    T data;
    DLNode<T>* ptrPrev;
    DLNode<T>* ptrNext;
};

#endif
4.2. DLNode's Constructor
- The Node's constructor is responsible for setting the pointers to nullptr for safety!
Since we're working with templates here our function definitions need to go in this .h file as well - no .cpp file! Define the Node's constructor beneath the declaration.
template <typename T>
DLNode<T>::DLNode()
{
    ptrPrev = nullptr;
    ptrNext = nullptr;
}

template <typename T>
DLNode<T>::DLNode( T newData )
{
    data = newData;
    ptrPrev = nullptr;
    ptrNext = nullptr;
}
4.3. Structure of our DoublyLinkedList
And within a DLinkedList.h file, we will create our Doubly Linked List's class declaration:
| DoublyLinkedList | |
|---|---|
- ptrFirst |
: DLNode<TYPE>* |
- ptrLast |
: DLNode<TYPE>* |
- itemCount |
: unsigned int |
+ DLinkedList() |
|
+ ~DLinkedList() |
|
+ PushFront( newData: TYPE ) |
: void |
+ PopFront() |
: void |
+ GetFront() |
: TYPE& |
+ PushBack( newData: TYPE ) |
: void |
+ PopBack() |
: void |
+ GetBack() |
: TYPE& |
+ PushAt( newData: TYPE, index: unsigned int ) |
: void |
+ PopAt( index: unsigned int ) |
: void |
+ GetAt( index: unsigned int ) |
: TYPE& |
+ IsEmpty() |
: bool |
+ Size() |
: unsigned int |
+ Clear() |
: void |
- The Push functions are to add new items. There are three
varieties: Add to the start of the list (PushFront), Add to the
endof the list (PushBack), and Add to somewhere in the middle of the list (PushAtIndex). - The Pop functions are to remove items.
- The Get functions are to access data stored in Nodes.
- Depending on the design of the List, sometimes the "AtIndex" functions won't be implemented.
template <typename T>
class DLinkedList
{
public:
    DLinkedList();
    ~DLinkedList();

    void PushFront( T newData );
    void PopFront();
    T& GetFront();

    void PushBack( T newData );
    void PopBack();
    T& GetBack();

    void PushAt( T newData, unsigned int index );
    void PopAt( unsigned int index );
    T& GetAt( unsigned int index );

    bool IsEmpty() const;
    unsigned int Size() const;
    void Clear();

private:
    DLNode<T>* ptrFirst;
    DLNode<T>* ptrLast;
    unsigned int itemCount;

    friend class DLinkedListTester;
};

template <typename T>
DLinkedList<T>::DLinkedList()
{
}

template <typename T>
DLinkedList<T>::~DLinkedList()
{
}

template <typename T>
void DLinkedList<T>::Clear()
{
}

template <typename T>
bool DLinkedList<T>::IsEmpty() const
{
    return false; // stub
}

template <typename T>
unsigned int DLinkedList<T>::Size() const
{
    return 0; // stub
}

template <typename T>
void DLinkedList<T>::PushFront( T newData )
{
}

template <typename T>
void DLinkedList<T>::PopFront()
{
}

template <typename T>
T&   DLinkedList<T>::GetFront()
{
    throw runtime_error( "not implemented" ); // stub
}

template <typename T>
void DLinkedList<T>::PushBack( T newData )
{
}

template <typename T>
void DLinkedList<T>::PopBack()
{
}

template <typename T>
T&   DLinkedList<T>::GetBack()
{
    throw runtime_error( "not implemented" ); // stub
}

template <typename T>
void DLinkedList<T>::PushAt( T newData, unsigned int index )
{
}

template <typename T>
void DLinkedList<T>::PopAt( unsigned int index )
{
}

template <typename T>
T&   DLinkedList<T>::GetAt( unsigned int index )
{
    throw runtime_error( "not implemented" ); // stub
}

We're going to look at the way functions work, assuming we're using doubly-linked Nodes. This is because it's more straightforward, and once you understand how doubly-linked lists work, you can figure out how a singly-linked list works (it just means more traversing).
4.4. DoublyLinkedListTester
We're going to write unit tests here as well to validate our work. Create DLinkedListTester.h and DLinkedListTester.cpp files and add the following to the header file:
#ifndef _DLINKEDLISTTESTER
#define _DLINKEDLISTTESTER

class DLinkedListTester
{
public:
    void Test_Constructor();

    void Test_Clear();
    void Test_IsEmpty();
    void Test_Size();

    void Test_PushFront();
    void Test_PopFront();
    void Test_GetFront();

    void Test_PushBack();
    void Test_PopBack();
    void Test_GetBack();

    void Test_PushAt();
    void Test_PopAt();
    void Test_GetAt();
};
#endif
You can also premake the function definitions in the .cpp file as well:
#include "DLinkedListTester.h"
#include "DLinkedList.h"

#include <iostream>
#include <string>
using namespace std;

void DLinkedListTester::Test_Constructor()
{
}

void DLinkedListTester::Test_Clear()
{
}

void DLinkedListTester::Test_IsEmpty()
{
}

void DLinkedListTester::Test_Size()
{
}

void DLinkedListTester::Test_PushFront()
{
}

void DLinkedListTester::Test_PopFront()
{
}

void DLinkedListTester::Test_GetFront()
{
}

void DLinkedListTester::Test_PushBack()
{
}

void DLinkedListTester::Test_PopBack()
{
}

void DLinkedListTester::Test_GetBack()
{
}

void DLinkedListTester::Test_PushAt()
{
}

void DLinkedListTester::Test_PopAt()
{
}

void DLinkedListTester::Test_GetAt()
{
}
4.5. main
Let's also create our main() function in a main.cpp file:
#include <iostream>
using namespace std;

#include "DLinkedListTester.h"

int main()
{
    DLinkedListTester tester;
    tester.Test_Constructor();
    tester.Test_Clear();
    tester.Test_IsEmpty();
    tester.Test_Size();
    tester.Test_PopFront();
    tester.Test_PushFront();
    tester.Test_GetFront();
    tester.Test_GetAt();
    tester.Test_PushBack();
    tester.Test_PopBack();
    tester.Test_GetBack();
    tester.Test_PushAt();
    tester.Test_PopAt();

    return 0;
}
4.6. DoublyLinkedList::DoublyLinkedList() constructor
When a new LinkedList is created, it is empty - no Nodes. Since we're working with pointers we need to be safe and set those to nullptr as well. We are expecting the constructor to do the following…
- Expectations after construction:
- (no term)
ptrFirstshould be nullptr.- (no term)
ptrLastshould be nullptr.- (no term)
itemCountshould be 0.
Unit test
First let's implement the unit test in DLinkedListTester.cpp, adding in what our expectations are and checking for failures:
void DLinkedListTester::Test_Constructor()
{
    cout << endl << "TEST SET: Constructor" << endl;
    { // Test 1
        string test_name = "New LinkedList, check ptrFirst, ptrLast, itemCount";

        DLinkedList<int> dlist;

        // Check for fail states
        if ( dlist.ptrFirst != nullptr )
        {
            cout << " - [FAIL] " << test_name << endl;
            cout << "  - Expected ptrFirst to be nullptr" << endl;
            cout << "  - Actual   ptrFirst: " << dlist.ptrFirst << endl;
        }
        else if ( dlist.ptrLast != nullptr )
        {
            cout << " - [FAIL] " << test_name << endl;
            cout << "  - Expected ptrLast to be nullptr" << endl;
            cout << "  - Actual   ptrLast: " << dlist.ptrLast << endl;
        }
        else if ( dlist.itemCount != 0 )
        {
            cout << " - [FAIL] " << test_name << endl;
            cout << "  - Expected itemCount to be 0" << endl;
            cout << "  - Actual   itemCount: " << dlist.itemCount << endl;
        }
        else
        {
            cout << " - [PASS] " << test_name << endl;
        }
    }
}
Since the Linked List constructor doesn't take in any parameters, we really only need this one test.
If we build and run our program now, the test should fail:
g++ *.h *.cpp -o tester.exe
[21:02:46] rachelwil@compute:../LinkedListStructure/$ ./tester.exe

TEST SET: Constructor
 - [FAIL] New LinkedList, check ptrFirst, ptrLast, itemCount
  - Expected ptrFirst to be nullptr
  - Actual   ptrFirst: 0x7fc994b8b9a0
Function implementation
Remember that the function definitions need to go in the same .h file as the class declaration, just underneath it!
template <typename T>
DLinkedList<T>::DLinkedList()
{
    ptrFirst = nullptr;
    ptrLast = nullptr;
    itemCount = 0;
}
Now when you build and run the tests again it should pass!
4.7. DoublyLinkedList::~DoublyLinkedList() Destructor
The destructor should make sure that all memory is freed when the LinkedList is
destroyed. I've moved this functionality into the Clear() function, so just
make sure to call Clear() within the destructor. We will implement
Clear() here in a moment.
template <typename T>
DLinkedList<T>::~DLinkedList()
{
    Clear();
}
4.8. Clear
The Clear function will be responsible to freeing the memory of all the nodes. You can implement this function by writing a while loop that continues looping while there are still items in the list, calling a Pop function until it is finally empty.
- Expectations after Clear():
ptrFirstshould be nullptr.ptrLastshould be nullptr.itemCountshould be 0.
We won't be able to test whether the Nodes themselves got destroyed, but we can at least make sure these variables get cleaned up. In fact, you can reuse the constructor test for the Clear function, but set up a single node:
DLinkedList<string> dlist;
dlist.itemCount = 1;
dlist.ptrFirst = new DLNode<string>;
dlist.ptrLast = dlist.ptrFirst;
And make sure that the Clear function is called before your if/else if/else fail/pass statements:
dlist.Clear();
Function implementation
While our list is not empty, we want to keep removing things. We can do this with the front or the back of the list.
Take note:
- Since this function relies on other functions, its functionality won't properly work until these functions are implemented. Additionally, the program won't build until you at least have function stubs for IsEmpty and PopFront.
- Additionally, until PopFront is implemented, the tests won't run
(every time a LinkedList is destroyed, it will get stuck at
while ( !IsEmpty() )because nothing is making it empty!
template <typename T>
void DLinkedList<T>::Clear()
{
    while ( !IsEmpty() )
    {
        PopFront();

    }
  ptrFirst = nullptr;
  ptrLast = nullptr;
}
4.9. IsEmpty
- Expectations of IsEmpty():
- Returns
trueif the node count is 0. - Returns
falseotherwise.
Unit test
I'll start with the first test - an empty list should have
IsEmpty() return true. You'll implement the other scenario.
void DLinkedListTester::Test_IsEmpty()
{
    cout << endl << "TEST SET: IsEmpty" << endl;

    { // Test 1
        string test_name = "Create empty list, check IsEmpty result";

        DLinkedList<int> dlist;
        dlist.itemCount = 0;

        bool expect_result = true;
        bool actual_result = dlist.IsEmpty();

        // Check for fail states
        if ( actual_result != expect_result )
        {
            cout << " - [FAIL] " << test_name << endl;
            cout << "  - Expected IsEmpty(): " << expect_result << endl;
            cout << "  - Actual   IsEmpty(): " << actual_result << endl;
        }
        else
        {
            cout << " - [PASS] " << test_name << endl;
        }
    }

    // TODO: Add one more test for when list is not empty.
}
Function implementation
You can then implement the function as such:
template <typename T>
bool DLinkedList<T>::IsEmpty() const
{
    return ( itemCount == 0 );
}
4.10. Size
Return the value of itemCount.
- Expectations of Size():
- Returns the value stored in
itemCount.
Unit test
void DLinkedListTester::Test_Size()
{
    cout << endl << "TEST SET: Size" << endl;

    { // Test 1
        string test_name = "Create empty list, check Size result";

        DLinkedList<int> dlist;
        dlist.itemCount = 0;

        unsigned int expect_result = 0;
        unsigned int actual_result = dlist.Size();

        // Check for fail states
        if ( actual_result != expect_result )
        {
            cout << " - [FAIL] " << test_name << endl;
            cout << "  - Expected Size(): " << expect_result << endl;
            cout << "  - Actual   Size(): " << actual_result << endl;
        }
        else
        {
            cout << " - [PASS] " << test_name << endl;
        }
    }

    // TODO: Add one more test for when list has a larger itemCount.
}
Function implementation
The implmeentation should be straightforward:
template <typename T>
unsigned int DLinkedList<T>::Size() const
{
    return itemCount;
}
4.11. PopFront
- Expectations of PopFront():
- For an empty list:
- Throw an exception
- For a list with only 1 item:
- Delete the only Node.
- Set List's
ptrFirstandptrLasttonullptr. - Subtracts 1 from
itemCount.
- For a list with more than 1 item:
- Updates List
ptrFirstto be the second Node. - Deletes the old-first.
- Updates the new-first's ptrPrev to
nullptr. - Subtracts 1 from
itemCount.
- Updates List
- For an empty list:
Unit test
Since we have 3 difference scenarios we're looking for, I'm going to
implement 3 unit tests here. You can use these for reference later
when implementing Test_PopBack() on your own.
void DLinkedListTester::Test_PopFront()
{
    cout << endl << "TEST SET: PopFront" << endl;

    { // Test 1
        string test_name = "Try to pop from empty list - get exception?";

        DLinkedList<int> dlist;
        dlist.itemCount = 0;

        bool exception_thrown = false;

        try
        {
            dlist.PopFront();
        }
        catch( ... ) // Catch all exceptions
        {
            exception_thrown = true;
        }

        // Check for fail states
        if ( exception_thrown == false )
        {
            cout << " - [FAIL] " << test_name << endl;
            cout << "  - Expected exception thrown!" << endl;
            cout << "  - Actually no exception thrown :(" << endl;
        }
        else
        {
            cout << " - [PASS] " << test_name << endl;
        }
    }

    { // Test 2
        string test_name = "Try to pop from list with 1 Node.";

        // Setup
        DLinkedList<int> dlist;
        dlist.ptrFirst = new DLNode<int>;
        dlist.ptrLast = dlist.ptrFirst;
        dlist.itemCount = 1;

        // Action
        dlist.PopFront();

        // Check for fail states
        if ( dlist.itemCount != 0 )
        {
            cout << " - [FAIL] " << test_name << endl;
            cout << "  - Expected itemCount to be 0" << endl;
            cout << "  - Actual   itemCount: " << dlist.itemCount << endl;
        }
        else if ( dlist.ptrFirst != nullptr )
        {
            cout << " - [FAIL] " << test_name << endl;
            cout << "  - Expected ptrFirst to be nullptr" << endl;
            cout << "  - Actual   ptrFirst: " << dlist.ptrFirst << endl;
        }
        else if ( dlist.ptrLast != nullptr )
        {
            cout << " - [FAIL] " << test_name << endl;
            cout << "  - Expected ptrLast to be nullptr" << endl;
            cout << "  - Actual   ptrLast: " << dlist.ptrLast << endl;
        }
        else
        {
            cout << " - [PASS] " << test_name << endl;
        }
    }

    { // Test 3
        string test_name = "Try to pop from list with 3 Nodes.";

        // Setup
        DLinkedList<string> dlist;
        DLNode<string>* nodeA = new DLNode<string>("A");
        DLNode<string>* nodeB = new DLNode<string>("B");
        DLNode<string>* nodeC = new DLNode<string>("C");

        nodeA->ptrNext = nodeB;
        nodeB->ptrPrev = nodeA;
        nodeB->ptrNext = nodeC;
        nodeC->ptrPrev = nodeB;

        dlist.ptrFirst = nodeA;
        dlist.ptrLast = nodeC;
        dlist.itemCount = 3;

        // Action
        dlist.PopFront();

        // Check for fail states
        if ( dlist.itemCount != 2 )
        {
            cout << " - [FAIL] " << test_name << endl;
            cout << "  - Expected itemCount to be 2" << endl;
            cout << "  - Actual   itemCount: " << dlist.itemCount << endl;
        }
        else if ( dlist.ptrFirst == nodeA )
        {
            cout << " - [FAIL] " << test_name << endl;
            cout << "  - Expected ptrFirst to not be nodeA anymore." << endl;
            cout << "  - Actual   ptrFirst still pointing to nodeA." << endl;
        }
        else if ( dlist.ptrFirst->ptrPrev != nullptr )
        {
            cout << " - [FAIL] " << test_name << endl;
            cout << "  - Expected ptrFirst->ptrPrev to be nullptr" << endl;
            cout << "  - Actual   ptrFirst->ptrPrev: "
                 << dlist.ptrFirst->ptrPrev << endl;
        }
        else
        {
            cout << " - [PASS] " << test_name << endl;
        }
    }
}
Function implementation
template <typename T>
void DLinkedList<T>::PopFront()
{
    if ( IsEmpty() ) // 0 items in list
    {
        throw runtime_error( "Can't pop from empty list!" );
    }

    else if ( Size() == 1 ) // removing last item
    {
        delete ptrFirst;
        ptrFirst = nullptr;
        ptrLast = nullptr;
        itemCount--;
    }

    else
    {
        ptrFirst = ptrFirst->ptrNext; // Set new-first
        delete ptrFirst->ptrPrev;     // Delete old-first
        ptrFirst->ptrPrev = nullptr;  // Reset node's ptrFirst
        itemCount--;
    }
}
Running the tests
Now you should finally be able to build and run the tests. Before, without PopFront implemented, the program would hang during destruction.
g++ *.h *.cpp -o tester.exe && ./tester.exe

TEST SET: Constructor
 - [PASS] New LinkedList, check ptrFirst, ptrLast, itemCount

TEST SET: Clear
 - [PASS] New LinkedList, check ptrFirst, ptrLast, itemCount

TEST SET: IsEmpty
 - [PASS] Create empty list, check IsEmpty result

TEST SET: Size
 - [PASS] Create empty list, check Size result

TEST SET: PopFront
 - [PASS] Try to pop from empty list - get exception?
 - [PASS] Try to pop from list with 1 Node.
 - [PASS] Try to pop from list with 3 Nodes.
4.12. PushFront
- Expectations of PushFront( T newData ):
- A new Node will be set up, its data will be set to the newData passed in.
- If the Linked List is empty, then the new node will become its first and last node.
- Otherwise if the list is NOT empty:
- the new node will become the new-first item
- old-first's
ptrPrevwill point to new-first, and - new-first's
ptrNextwill point to old-first.
Unit test
Here I have tests for an empty list and a non-empty list. You again
don't need to add any additional tests to this one, but you will use
these for reference for Test_PushBack().
void DLinkedListTester::Test_PushFront()
{
    cout << endl << "TEST SET: PushFront" << endl;

    { // Test 1
        string test_name = "Add item to empty list.";

        // Setup
        DLinkedList<string> dlist;
        dlist.itemCount = 0;

        // Action
        dlist.PushFront( "X" );

        // Check for fail states
        if ( dlist.itemCount != 1 )
        {
            cout << " - [FAIL] " << test_name << endl;
            cout << "  - Expected itemCount to be 1" << endl;
            cout << "  - Actual   itemCount: " << dlist.itemCount << endl;
        }
        else if ( dlist.ptrFirst == nullptr )
        {
            cout << " - [FAIL] " << test_name << endl;
            cout << "  - Expected ptrFirst to NOT be nullptr." << endl;
            cout << "  - Actual   ptrFirst is nullptr." << endl;
        }
        else if ( dlist.ptrLast == nullptr )
        {
            cout << " - [FAIL] " << test_name << endl;
            cout << "  - Expected ptrLast to NOT be nullptr." << endl;
            cout << "  - Actual   ptrLast is nullptr." << endl;
        }
        else if ( dlist.ptrFirst->data != "X" )
        {
            cout << " - [FAIL] " << test_name << endl;
            cout << "  - Expected ptrFirst->data to be \"X\"" << endl;
            cout << "  - Actual   ptrFirst->data: \""
                 << dlist.ptrFirst->data << "\"" << endl;
        }
        else
        {
            cout << " - [PASS] " << test_name << endl;
        }
    }

    { // Test 2
        string test_name = "Add item to non-empty list.";

        // Setup
        DLinkedList<string> dlist;
        DLNode<string>* nodeA = new DLNode<string>("A");
        DLNode<string>* nodeB = new DLNode<string>("B");
        DLNode<string>* nodeC = new DLNode<string>("C");

        nodeA->ptrNext = nodeB;
        nodeB->ptrPrev = nodeA;
        nodeB->ptrNext = nodeC;
        nodeC->ptrPrev = nodeB;

        dlist.ptrFirst = nodeA;
        dlist.ptrLast = nodeC;
        dlist.itemCount = 3;

        // Action
        dlist.PushFront( "X" );

        // Check for fail states
        if ( dlist.itemCount != 4 )
        {
            cout << " - [FAIL] " << test_name << endl;
            cout << "  - Expected itemCount to be 4" << endl;
            cout << "  - Actual   itemCount: " << dlist.itemCount << endl;
        }
        else if ( dlist.ptrFirst == nodeA )
        {
            cout << " - [FAIL] " << test_name << endl;
            cout << "  - Expected ptrFirst to NOT be nodeA anymore." << endl;
            cout << "  - Actual   ptrFirst is still nodeA." << endl;
        }
        else if ( dlist.ptrFirst->data != "X" )
        {
            cout << " - [FAIL] " << test_name << endl;
            cout << "  - Expected ptrFirst->data to be \"X\"" << endl;
            cout << "  - Actual   ptrFirst->data: \""
                 << dlist.ptrFirst->data << "\"" << endl;
        }
        else if ( dlist.ptrFirst->ptrNext != nodeA )
        {
            cout << " - [FAIL] " << test_name << endl;
            cout << "  - Expected ptrFirst->ptrNext nodeA" << endl;
            cout << "  - Actual   ptrFirst->ptrNext: "
                 << dlist.ptrFirst->ptrNext << endl;
            cout << endl;
            cout << "  - All nodes:" << endl;
            cout << "   - nodeA: " << nodeA << endl;
            cout << "   - nodeB: " << nodeB << endl;
            cout << "   - nodeC: " << nodeC << endl;
        }
        else
        {
            cout << " - [PASS] " << test_name << endl;
        }
    }
}
Function implementation
We will need to check for the two different scenarios: Adding a first item to an empty list, and adding a new front item to a non-empty list.
template <typename T>
void DLinkedList<T>::PushFront( T newData )
{
    if ( IsEmpty() ) // Adding the first item
    {
        ptrFirst = new DLNode<T>( newData );
        ptrLast = ptrFirst;
        itemCount++;
    }

    else // Items already in list
    {
        DLNode<T>* newNode = new DLNode<T>( newData );
        newNode->ptrNext = ptrFirst;
        ptrFirst->ptrPrev = newNode;
        ptrFirst = newNode;
        itemCount++;
    }
}
4.13. GetFront
- Expectations of GetFront():
- If the list is empty, then throw an exception.
- Otherwise return the data stored in the ptrFirst node.
Unit test
The Get function will either throw an exception (if the list is empty), or return the data itself, so I am checking for both:
void DLinkedListTester::Test_GetFront()
{
    cout << endl << "TEST SET: GetFront" << endl;
    { // Test 1
        string test_name = "Try to get from empty list - get exception?";

        DLinkedList<int> dlist;
        dlist.itemCount = 0;

        bool exception_thrown = false;

        try
        {
            int blah = dlist.GetFront();
        }
        catch( ... ) // Catch all exceptions
        {
            exception_thrown = true;
        }

        // Check for fail states
        if ( exception_thrown == false )
        {
            cout << " - [FAIL] " << test_name << endl;
            cout << "  - Expected exception thrown!" << endl;
            cout << "  - Actually no exception thrown :(" << endl;
        }
        else
        {
            cout << " - [PASS] " << test_name << endl;
        }
    }

    { // Test 2
        string test_name = "Try to access front item from list with 1 node.";

        // Setup
        DLinkedList<string> dlist;
        dlist.ptrFirst = new DLNode<string>("X");
        dlist.ptrLast = dlist.ptrFirst;
        dlist.itemCount = 1;

        // Action
        string expect_result = "X";
        string actual_result = dlist.GetFront();

        // Check for fail states
        if ( actual_result != expect_result )
        {
            cout << " - [FAIL] " << test_name << endl;
            cout << "  - Expected GetFront(): " << expect_result << endl;
            cout << "  - Actual   GetFront(): " << actual_result << endl;
        }
        else
        {
            cout << " - [PASS] " << test_name << endl;
        }
    }
}
Function implementation
And the function implementation is pretty simple:
template <typename T>
T&   DLinkedList<T>::GetFront()
{
    if ( IsEmpty() ) // 0 items in list
    {
        throw runtime_error( "Can't get from empty list!" );
    }

    return ptrFirst->data;
}
4.14. GetAt
- Expectations of GetAt( unsigned int index ):
- If the index is invalid, throws an exception.
- Or if the list is empty, throws an exception.
- Otherwise return the data at that position.
Unit test
We need to check that two error states are handled here: An empty list, and an invalid index, as well as making sure that if we are accessing a node that we retrieve the data that we expect.
void DLinkedListTester::Test_GetAt()
{
    cout << endl << "TEST SET: GetAt" << endl;
    { // Test 1
        string test_name = "Try to get from empty list - get exception?";

        DLinkedList<int> dlist;
        dlist.itemCount = 0;

        bool exception_thrown = false;

        try
        {
            int blah = dlist.GetAt(1);
        }
        catch( ... ) // Catch all exceptions
        {
            exception_thrown = true;
        }

        // Check for fail states
        if ( exception_thrown == false )
        {
            cout << " - [FAIL] " << test_name << endl;
            cout << "  - Expected exception thrown!" << endl;
            cout << "  - Actually no exception thrown :(" << endl;
        }
        else
        {
            cout << " - [PASS] " << test_name << endl;
        }
    }

    { // Test 2
        string test_name = "Try to get from invalid index - get exception?";

        DLinkedList<int> dlist;
        dlist.ptrFirst = new DLNode<int>(123);
        dlist.itemCount = 1;

        bool exception_thrown = false;

        try
        {
            int blah = dlist.GetAt(2);
        }
        catch( ... ) // Catch all exceptions
        {
            exception_thrown = true;
        }

        // Check for fail states
        if ( exception_thrown == false )
        {
            cout << " - [FAIL] " << test_name << endl;
            cout << "  - Expected exception thrown!" << endl;
            cout << "  - Actually no exception thrown :(" << endl;
        }
        else
        {
            cout << " - [PASS] " << test_name << endl;
        }
    }

    { // Test 3
        string test_name = "Try to access front item from list with 3 nodes.";

        // Setup
        DLinkedList<string> dlist;
        DLNode<string>* nodeA = new DLNode<string>("A");
        DLNode<string>* nodeB = new DLNode<string>("B");
        DLNode<string>* nodeC = new DLNode<string>("C");

        nodeA->ptrNext = nodeB;
        nodeB->ptrPrev = nodeA;
        nodeB->ptrNext = nodeC;
        nodeC->ptrPrev = nodeB;

        dlist.ptrFirst = nodeA;
        dlist.ptrLast = nodeC;
        dlist.itemCount = 3;

        // Action
        string expect_result = "B";
        string actual_result = dlist.GetAt(1);

        // Check for fail states
        if ( actual_result != expect_result )
        {
            cout << " - [FAIL] " << test_name << endl;
            cout << "  - Expected GetAt(1): " << expect_result << endl;
            cout << "  - Actual   GetAt(1): " << actual_result << endl;
        }
        else
        {
            cout << " - [PASS] " << test_name << endl;
        }
    }
}
Function implementation
Again we need our error checks. If there are no errors, we use a pointer to point to the first address in the list. From there, we need to loop index amount of times to get to the proper location. Once we're there we return the data.
template <typename T>
T&   DLinkedList<T>::GetAt( unsigned int index )
{
    if ( IsEmpty() ) // 0 items in list
    {
        throw runtime_error( "Can't get from empty list!" );
    }

    if ( index < 0 || index >= itemCount ) // bad index
    {
        throw runtime_error( "Can't get from invalid index!" );
    }

    DLNode<T>* ptrWalker = ptrFirst;
    for ( unsigned int i = 0; i < index; i++ ) // walk to index
    {
        ptrWalker = ptrWalker->ptrNext;
    }

    return ptrWalker->data; // return the data here
}
4.15. Tips for the remaining functions
These implementations should cover the patterns you need to complete the rest of the structure, as well as the more graphical explanations of implementations from the "List class" section.
Make sure to just tackle one function - and one scenario per function - at a time. Build a test for one thing at a time. Take it step-by-step - it will be easier to debug issues that way.
And don't forget that you can build it with debug symbols in this way:
g++ -g *.cpp -o tester.exe
And run the debugger with:
gdb tester.exe         (LINUX/WINDOWS)

lldb tester.exe        (MAC)
4.16. PopBack
- Expectations of PopBack():
- For an empty list:
- Throw an exception
- For a list with only 1 item:
- Delete the only Node.
- Set List's
ptrFirstandptrLasttonullptr. - Subtracts 1 from
itemCount.
- For a list with more than 1 item:
- Updates List
ptrLastto be the second-to-last Node. - Deletes the old-last.
- Updates the new-last's ptrNext to
nullptr. - Subtracts 1 from
itemCount.
- Updates List
- For an empty list:
4.17. PushBack
- Expectations of PushBack( T newData ):
- A new Node will be set up, its data will be set to the newData passed in.
- If the Linked List is empty, then the new node will become its first and last node.
- Otherwise if the list is NOT empty:
- the new node will become the new-last item
- old-last's
ptrNextwill point to new-last, and - new-last's
ptrPrevwill point to old-last.
4.18. GetBack
- Expectations of GetBack():
- If the list is empty, then throw an exception.
- Otherwise return the data stored in the ptrLast node.
4.19. PopAt
- Expectations of PopAt( unsigned int index ):
- If the index is invalid, throws an exception.
- Or if the list is empty, throws an exception.
- If index is 0, call PopFront instead.
- If index is itemCount-1, call PopBack instead.
- Otherwise:
- A walker will be used to find the location to be deleted.
- "before" is walker->ptrPrev, "after" is walker->ptrNext.
- before's
ptrNextis after. - after's
ptrPrevis before. - delete the node at the walker.
- decrement the itemCount.
4.20. PushAt
- Expectations of PushAt( T newData, unsigned int index ):
- If the index is invalid, throws an exception.
- If index is 0, call PushFront instead.
- If index is itemCount, call PushBack instead.
- Otherwise:
- A walker will be used to find the location of the current index item.
- We will create a new node.
- "before" is walker->ptrPrev, "after" is walker. (NOT ptrNext!)
- before's
ptrNextis new node. - new node's
ptrPrevis before. - new node's
ptrNextis after. - after's
ptrPrevis new node. - Increment item count by 1.